
도전과제 04
화면 위쪽에 텍스트 입력상자, 아래쪽에 [전송]과 [닫기] 버튼을 수평으로 배치해 보세요.
- MS로 문자를 전송하는 화면은 위쪽에 텍스트 입력상자, 아래쪽에 [전송]과 [닫기] 버튼을 수평으로 배치하도록 구성합니다.
- 텍스트 입력상자 바로 아래에 입력되는 글자의 바이트 수를 '10/80 바이트'와 같은 포맷으로 표시하되 우측 정렬로 하도록 하고 색상을 눈에 잘 띄는 다른 색으로 설정합니다.
- 텍스트 입력상자에 입력되는 글자의 크기와 줄 간격을 조정하여 한 줄에 한글 8글자가 들어가도록 만들어 봅니다.
- [전송] 버튼을 누르면 입력된 글자를 화면에 토스트로 표시하여 내용을 확인할 수 있게 합니다.
참고할 점
화면에서 '10/80 바이트'로 된 글자 부분을 가장 위쪽으로 배치합니다.
입력상자에 글자가 입력될 때마다 자동으로 호출되는 메서드를 사용합니다.
풀이
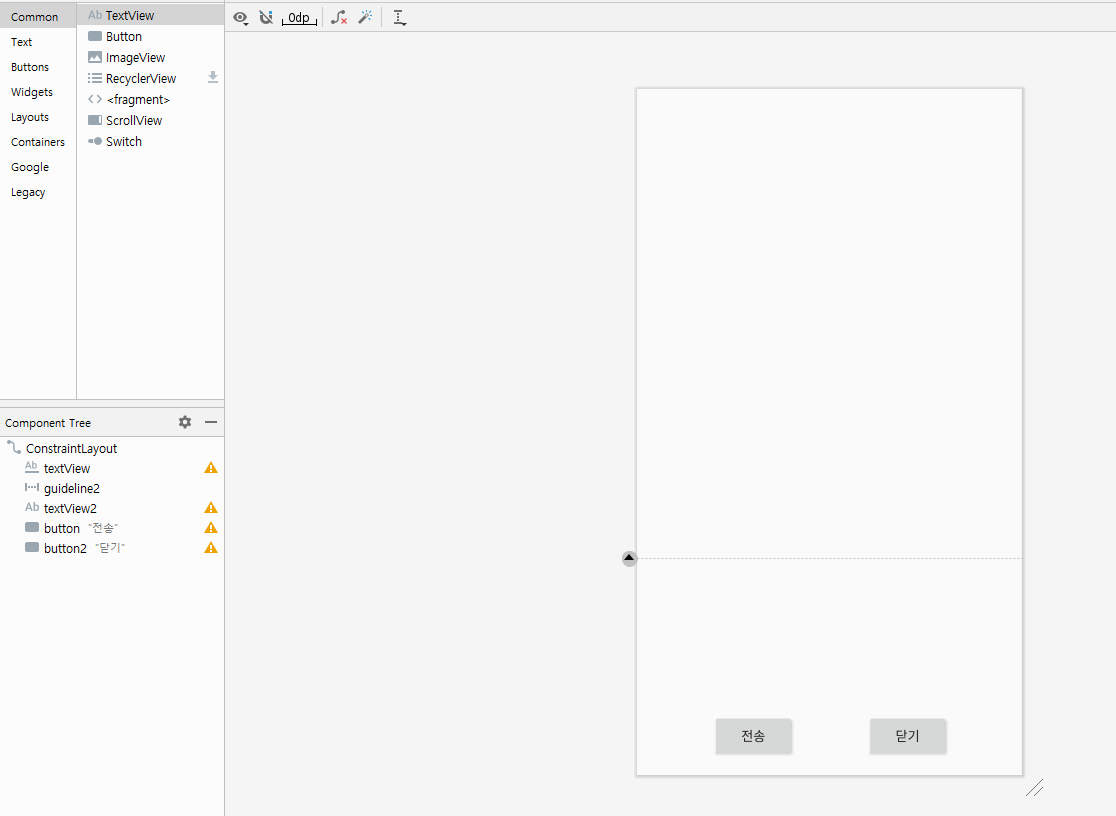
우선 activity_main 화면부터 보도록 하겠다.
텍스트를 입력하는 EditText와 입력 바이트를 표현할 TextView, 그리고 버튼 두개를 레이아웃에 담는다.
이때 한 줄에 8글자가 들어가도록 하는 것은 억지스럽지만 입력 텍스트 크기를 조절해서 구현하였다.
<!--activitiy_main.xml-->
<?xml version="1.0" encoding="utf-8"?>
<androidx.constraintlayout.widget.ConstraintLayout xmlns:android="http://schemas.android.com/apk/res/android"
xmlns:app="http://schemas.android.com/apk/res-auto"
xmlns:tools="http://schemas.android.com/tools"
android:layout_width="match_parent"
android:layout_height="match_parent"
tools:context=".MainActivity">
<EditText
android:id="@+id/textView"
android:layout_width="0dp"
android:layout_height="0dp"
android:layout_margin="10dp"
android:clickable="true"
android:cursorVisible="true"
android:gravity="center"
android:hint="입력상자"
android:padding="10dp"
android:textSize="50dp"
app:layout_constraintBottom_toTopOf="@+id/guideline2"
app:layout_constraintEnd_toEndOf="parent"
app:layout_constraintHorizontal_bias="0.473"
app:layout_constraintStart_toStartOf="parent"
app:layout_constraintTop_toTopOf="parent"
app:layout_constraintVertical_bias="0.8" />
<androidx.constraintlayout.widget.Guideline
android:id="@+id/guideline2"
android:layout_width="wrap_content"
android:layout_height="wrap_content"
android:orientation="horizontal"
app:layout_constraintGuide_begin="500dp" />
<TextView
android:id="@+id/textView2"
android:layout_width="0dp"
android:layout_height="wrap_content"
android:layout_margin="10dp"
android:gravity="right"
android:textSize="18sp"
app:layout_constraintBottom_toBottomOf="parent"
app:layout_constraintEnd_toEndOf="parent"
app:layout_constraintHorizontal_bias="1.0"
app:layout_constraintStart_toStartOf="parent"
app:layout_constraintTop_toTopOf="@+id/guideline2"
app:layout_constraintVertical_bias="0.0" />
<Button
android:id="@+id/button"
android:layout_width="wrap_content"
android:layout_height="wrap_content"
android:onClick="onbuttonSend"
android:text="전송"
app:layout_constraintBottom_toBottomOf="parent"
app:layout_constraintEnd_toEndOf="parent"
app:layout_constraintHorizontal_bias="0.25"
app:layout_constraintStart_toStartOf="parent"
app:layout_constraintTop_toTopOf="@+id/guideline2"
app:layout_constraintVertical_bias="0.902" />
<Button
android:id="@+id/button2"
android:layout_width="wrap_content"
android:layout_height="wrap_content"
android:onClick="onbuttonClose"
android:text="닫기"
app:layout_constraintBottom_toBottomOf="parent"
app:layout_constraintEnd_toEndOf="parent"
app:layout_constraintStart_toEndOf="@+id/button"
app:layout_constraintTop_toTopOf="@+id/guideline2"
app:layout_constraintVertical_bias="0.902" />
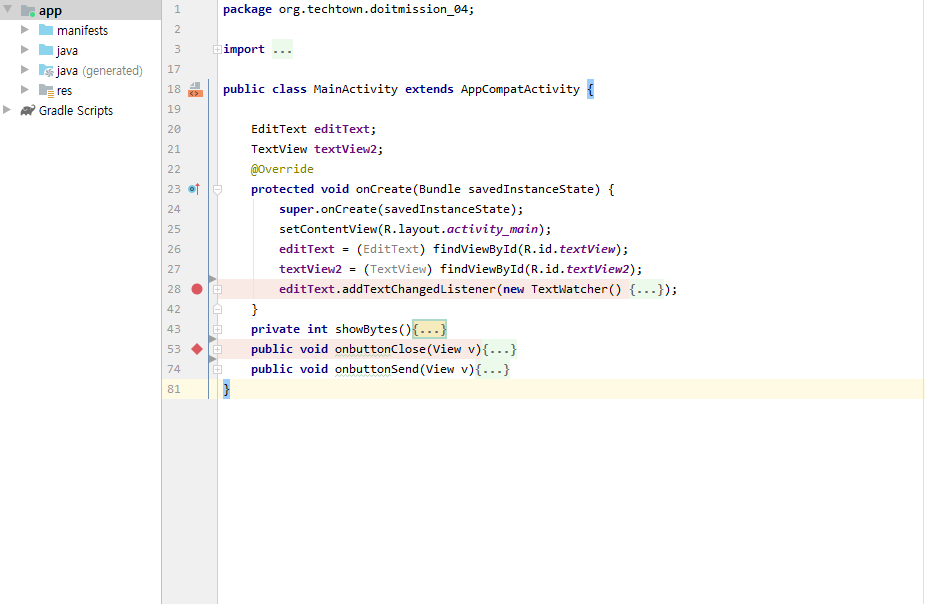
</androidx.constraintlayout.widget.ConstraintLayout>MainActivity에서는 우선 shoBytes()라는 메소드를 만들어 입력된 바이트 수를 표현하였다.
length에 editText에 있는 텍스트의 바이트를 얻어와 textView에 표현하였다.
    private int showBytes(){
        try{
            int length = editText.getText().toString().getBytes("EUC-KR").length;
            textView2.setText(length + " / 80 바이트");
            return length;
        }catch(UnsupportedEncodingException e){
            e.printStackTrace();
        }
        return -1;
    }
또한 글자가 입력될 때 마다 자동으로 호출되는 editText의 addTextChangedListener 객체를 구현하였다.
텍스트가 바뀌면 호출되는 afterTextChanged() 메소드에 showBytes()메소드와, 길이제한 80바이트를 적용시켰다.
80바이트를 초과하면, 텍스트를 입력하기 전 메세지를 저장해두었다가 그대로 적용시켰다.
 editText.addTextChangedListener(new TextWatcher() {
            String beforeText;
            public void beforeTextChanged(CharSequence s, int start, int count, int after) {
                beforeText = s.toString();
            }

            public void onTextChanged(CharSequence s, int start, int before, int count) {
            }

            public void afterTextChanged(Editable s) {
                int length = showBytes();
                if(length > 80) editText.setText(beforeText);
            }
        });
전송 버튼을 눌렀을 때 토스트에 표시되는 것은, 버튼의 onClick시 호출되는 메소드를 onbuttonSend()로 정의한 뒤
editText에서 메세지를 받아와 Toast를 통하여 구현하였다.
    public void onbuttonSend(View v){
       String s =  editText.getText().toString();
       //토스트 사용
       final Toast toast = Toast.makeText(getApplicationContext(), s, Toast.LENGTH_LONG);
       toast.show();
       editText.setText("");
    }
마지막으로 문제와는 관련 없으나, 닫기 버튼을 onbuttonClose()메소드를 통해 구현하였다.
AlterDialog를 통하여 종료 여부를 물은 뒤 종료/취소하게 만들었다.
    public void onbuttonClose(View v){
        AlertDialog.Builder builder = new AlertDialog.Builder(MainActivity.this);
        builder.setMessage("정말로 종료하시겠습니까?");
        builder.setTitle("종료 알림창")
                .setCancelable(false)
                .setNegativeButton("No", new DialogInterface.OnClickListener() {
                    @Override
                    public void onClick(DialogInterface dialog, int i) {
                        dialog.cancel();
                    }
                })
                .setPositiveButton("Yes", new DialogInterface.OnClickListener() {
                    @Override
                    public void onClick(DialogInterface dialog, int i) {
                        finish();
                    }
                });
        AlertDialog alert = builder.create();
        alert.setTitle("종료 알림창");
        alert.show();
    }
최종 코드는 위 코드블럭들을 합치면 된다!
결과
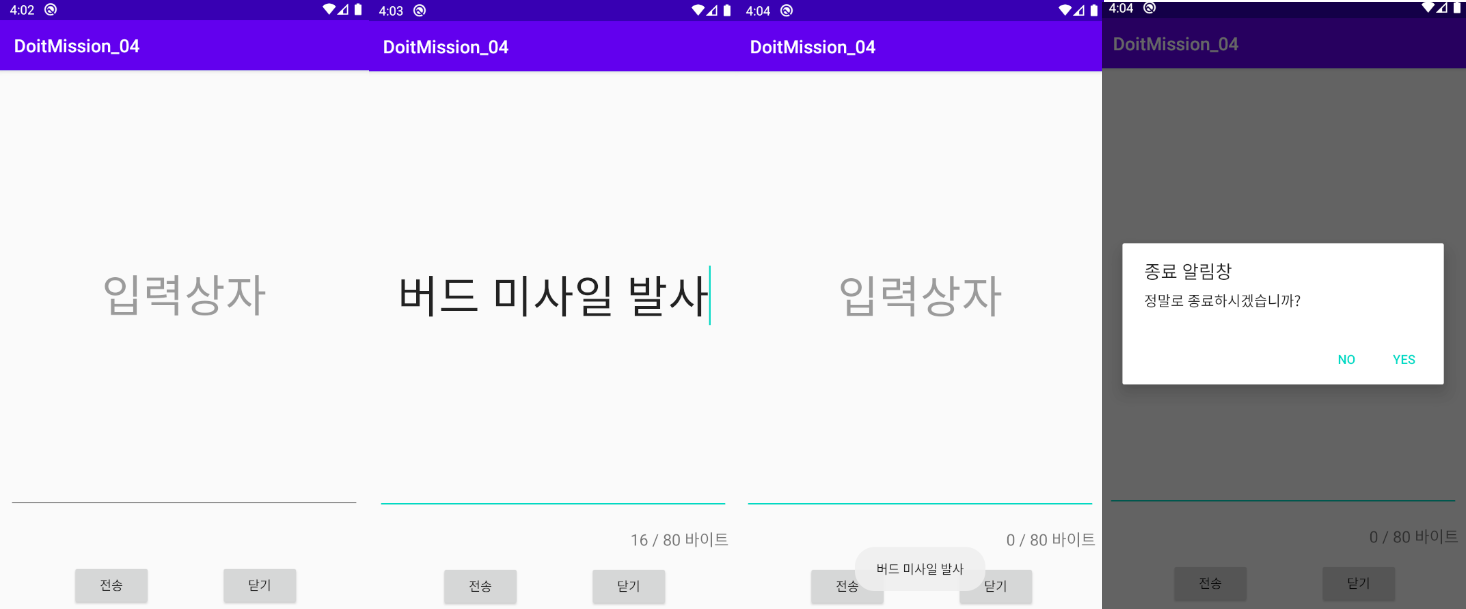
이때 한글은 유니코드라 한 글자에 2바이트씩 인식하였다
전체 프로젝트
https://github.com/howtolivelikehuman/DoitAndroid/tree/master/DoitMission_04
'코딩 > Do it Android [JAVA]' 카테고리의 다른 글
| 도전과제 09 :고객 정보 입력화면의 구성 (Do it 안드로이드 앱 프로그래밍) [JAVA] (0) | 2020.08.10 |
|---|---|
| 도전과제 07,08 : 세 개 이상의 화면 만들어 전환하기 (Do it 안드로이드 앱 프로그래밍) [JAVA] (0) | 2020.08.09 |
| 도전과제 06 : 시크바와 프로그레스바 보여주기 (Do it 안드로이드 앱 프로그래밍) [JAVA] (0) | 2020.07.26 |
| 도전과제 05 : 두 종류의 버튼 모양 만들기 (Do it 안드로이드 앱 프로그래밍) [JAVA] (0) | 2020.07.26 |
| 도전과제 03 : 두 개의 이미지뷰에이미지 번갈아 보여주기(Do it 안드로이드 앱 프로그래밍) [JAVA] (0) | 2020.07.25 |
Comment